Aha! Roadmaps | View Aha! records on whiteboards
Pull existing data in Aha! Roadmaps on to a whiteboard to refine your plans. You can add records — including ideas, features, epics, and initiatives — individually or in bulk. Those records will exist on your product roadmap and in your whiteboard — and you can view and adjust details in either place.
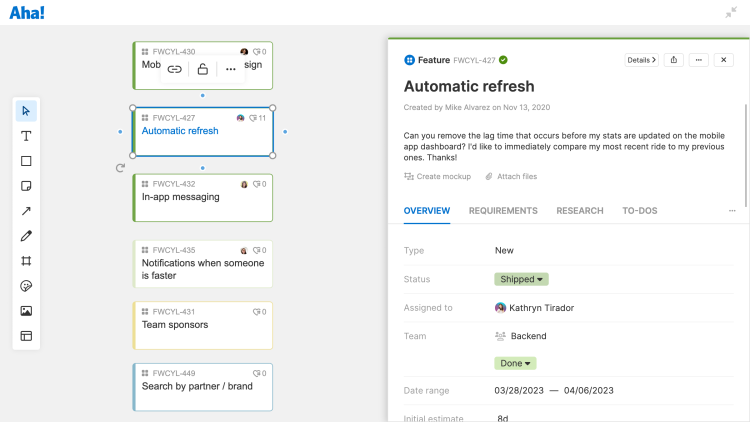
When you add records to your whiteboard, anyone with viewing access to your whiteboard will be able to see the names of records. Only whiteboard users with access to the workspace(s) where the records are located will be able to open the records and view their data.
Click any of the following links to skip ahead:
Search and add records
Search for and add records in your Aha! account right from your whiteboard.
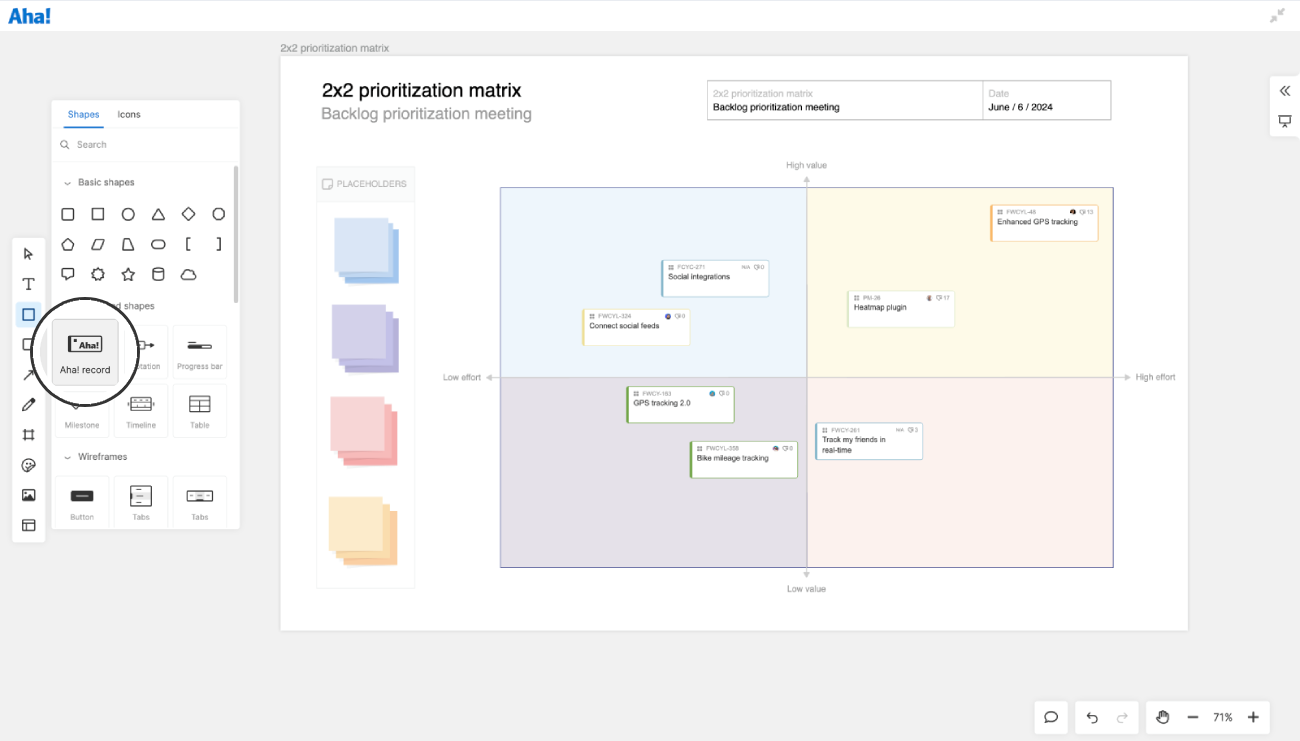
Access the Shapes menu from the whiteboard toolbar and select Aha! record.
![A whiteboard with a prioritization view, where a user is adding Aha! records]()
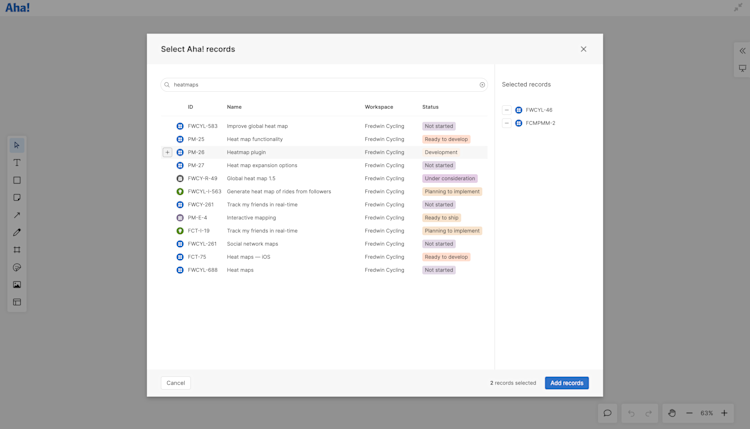
In the Search modal, use the search bar to find the record(s) you are looking for. You can search by a record's Title and Description.
All record types that meet the search terms will appear in search results.
Hover over an article to reveal its Add [+] button. Click it to select it. Selected records will populate in a column to the right.
Once you have selected all the records you want to add to your whiteboard, click Add records.
After adding your records, each of them will show as a record card, displaying the record's type and Title, Assignee, and Product value score fields.
If you want to show additional details on record cards, you can customize your record card layout.
Add from a report
The quickest way to add multiple records to your whiteboards at once is to export a list report of your records, then export the report to your whiteboard as records.
This video references Aha! Notebooks. In March 2024, we relaunched Aha! Notebooks as Aha! Knowledge.
Create a new list report. Use filters to narrow down your list. When your report has all the records you want to add to your whiteboard, save your view. Then click the Export button and select Add to whiteboard as records.
You can add features, epics, ideas, and initiatives as records. Other records in your report will export to your whiteboard as text.
The Add to whiteboard modal will open. Choose Existing whiteboard and select a whiteboard from the dropdown to add the records to a whiteboard that already exists in your workspace or personal documents. Choose Create new whiteboard and select a workspace to open the records in a new whiteboard (you can select None to open the new whiteboard in your personal documents.) Then click Add to whiteboard.
The new or existing whiteboard you selected in the previous step will open with all the records that were in your list report added.
Once the records are exported to your whiteboard, you can move them around freely. Click a record's name to open its drawer view. Each record will display its record type icon, record ID, name, assignee (if applicable) and product value score. Ideas will also display its number of votes. Each record's border color will reflect its status.
If you would like to view a live report on your whiteboard and you do not need to move around individual records, you can instead embed a live report.
Add with a link
You can add individual records to your whiteboard in seconds. Just copy a record's URL and paste it into your whiteboard or drag and drop it onto your whiteboard from another window. The record will be added automatically.
If you would prefer to view a record as a shape or sticky note, select the record and click the Shape icon on the record's toolbar and choose the shape you want to use.
Edit records from your whiteboard
Double-click a record's name to open its drawer view to edit it from your whiteboard.
To bulk edit records, select multiple records by pressing Shift and clicking on the desired records. When the bulk edit toolbar appear, click the More options menu and click Bulk edit. The bulk edit modal (the some one you use for bulk editing in list reports) will open. Edit the fields you want to apply to all selected records and click Apply.
Visualize dependencies between records
It is useful to have records on your whiteboard for activities like PI planning, quarterly planning, and launch planning. You can move records freely and reference them easily. You can even view dependencies between records to make planning more efficient.
You can create a dependency between two records on your whiteboard. Connect the two records with a line and use the Create dependency option in the connector's toolbar.
Right-click on a blank space on your whiteboard canvas or open your whiteboard's More options menu. Then select Show dependency lines.
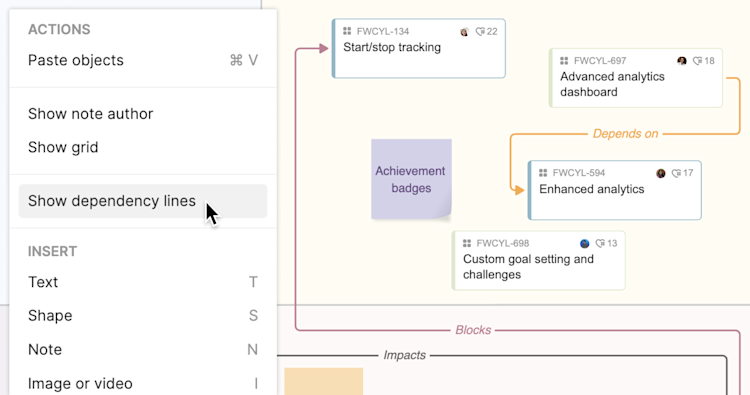
A connector will appear that shows you the relationship between records that are linked in Aha! Roadmaps. The following relationship types will appear on your whiteboard:
Depends on / Is a dependency of
Impacts / Is impacted by
Blocks / Is blocked by
You can edit the connector's color, style, weight, labels, and the path of the connector.To refresh dependency lines, right-click again and select Refresh dependency lines.
You can move dependency lines anywhere you like, but doing so will not change a record's relationship to another record. You will need to open a record's drawer view to do that.
Customize record cards
You can customize Aha! record cards on your whiteboard to display the information most important to you. Select a record and click the card layout icon in its toolbar to open the record card editor. From here, you can change a card's background, add and rearrange fields, and organize record cards the way you want to see them.
Click the gear ⚙️ dropdown to choose whether the Card highlight should highlight the record's status in the Background or just the Sidebar (leaving the background white).
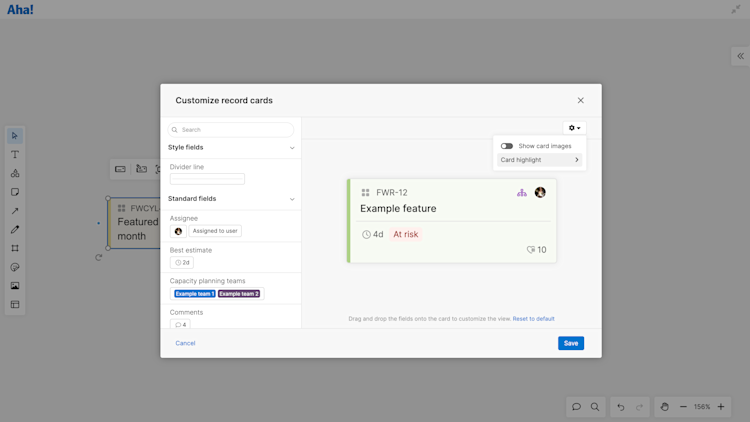
To customize the card layout:
Find the fields you want to add to the card layout. If you have a lot of available fields, use the Search at the top of the tab to find the one you need. You can also collapse Standard fields or Custom fields to show only one type of field.
Drag and drop fields onto a card to add them. Click the X beside a field to remove it.
You can drop fields next to others on the same row or beneath the bottom row of fields to create a new row on the layout.
Add a Divider line anywhere on the card layout to better organize key data.
Click Reset to default to revert your changes to the default layout, Cancel to exit the modal or Save to save your work.
