Aha! Roadmaps | How to add a custom field
Use custom fields to capture the exact data you need wherever you need it in your Aha! account. Add custom fields to any Aha! record type and use them to define work, align teams, and gather critical information that you can use in Aha! reports to inform your product strategy.
In this article, we will add two types of custom fields to a feature layout in Aha! Roadmaps. Follow along and give it a try!
Click any of the following links to skip ahead:
Confirm user permissions
You will configure custom fields and custom layouts in your Aha! account-level settings. To create a custom field and add it to a custom record layout, you need the following user permissions in your account:
Action | User permissions |
Add a custom field |
Decide what information you need to capture
Let’s say that we are on a product team and need a way to separate completed records into work that we will announce to customers and work that we will keep internal. We also need to record our external messaging about that work.
If all features in Aha! have custom fields to track customer-facing messaging, we can keep cross-functional teams aligned on what we tell our customers about new product features. So we will add two custom fields to our features layout: a predefined choice list field to record whether a public announcement will be made and a text field to record the official messaging of that announcement.
Open a record
For this article, we will focus on adding a predefined choice list field and a text field to a features layout. If you want to follow along in your Aha! account:
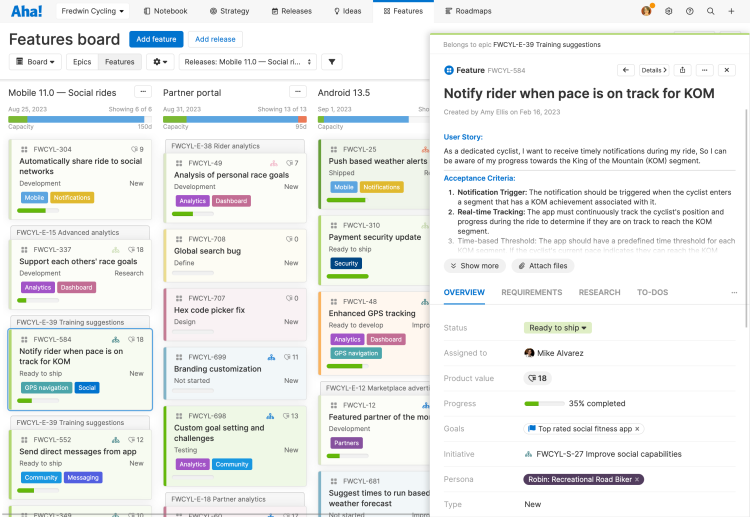
Navigate to Features Board .
Open Notify rider when pace is on track for KOM. The fields and tabs here are part of the feature's layout. Soon we will add our custom fields to this layout. But before we do, it is worth thinking about where our new fields should fit in the current custom layout. As a best practice, we put commonly used or fundamental fields at the top of a custom layout — and fields used infrequently at the bottom.

Add a custom field to your record layout
At the bottom of the feature, click + Add custom field to open the feature record layout. Before we make adjustments to the layout, we first want to make sure we are editing the correct views of our feature layout. In the upper-left corner, let's ensure that we are looking at the feature view. Now we can add our first field. We will start by adding a predefined choice field with the choices of "yes" and "no":
Select Create custom field from the left menu.
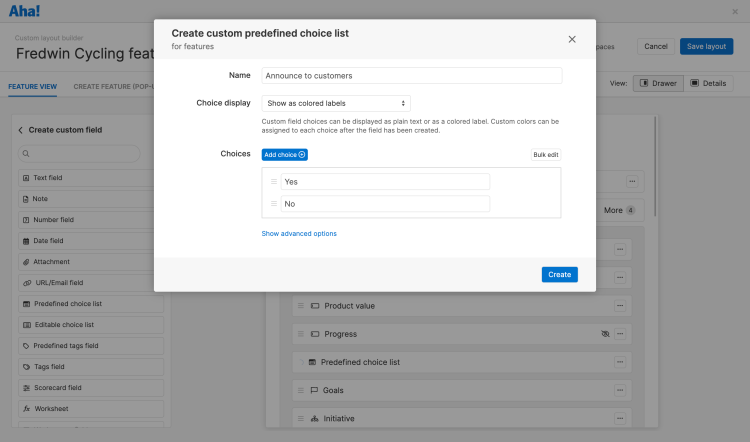
Find Predefined choice list in the menu and drag and drop it into feature layout. We have chosen the Predefined choice list because it gives Aha! users several different options to choose from in the field. It also limits what can be entered here to information relevant to the field. Like other fields, we can add predefined choice list fields to reports to help us sort by or narrow in on particular field choices later.
When the modal opens, add "Announce to customers" as the Name for our predefined choice filed, and select Show as colored labels next to Choice display. Plain text is also an acceptable option here, but we want other teams to be able to scan the feature and get a quick answer when they are responding to customers.
Now let's add our choices. Select + Add choice and type "Yes" in the field, then repeat and add "No."
Click Create to save the field.

We will add our second field below our first keep the two related fields together.
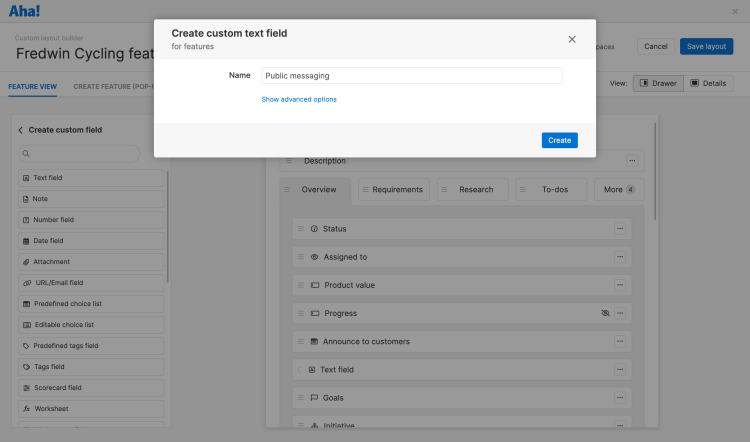
Select text field from the left and drag it beneath the Announce to customers field that we just added.
When the modal opens, type "Public messaging" in the name field. Click Create to save the new field.

Now would be a good time to ensure we have placed the fields where we want them on the feature layout. Everything looks great, so we will click Save layout to save our changes.
Use your new custom field
Now that we have saved the custom layout, we can use our new custom fields.
Navigate to Features Board.
Open Mileage notifications again.
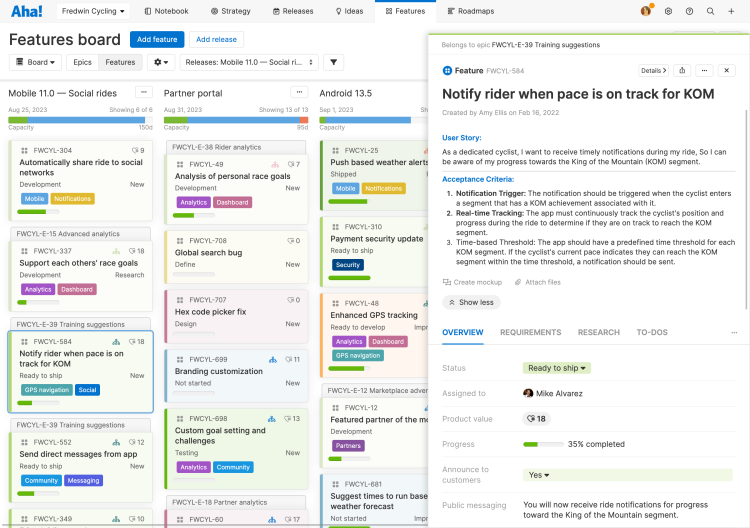
Notice the new custom fields! Let's mark Announce to customers as Yes, and add a message to the Public messaging field.

Success! We can also report on this custom field by adding it to pivot tables, charts, and list reports.
If you get stuck, please reach out to our Customer Success team. Our team is made up entirely of product experts and responds fast.